Making proper exposures when creating photographs has always been some what of a frightening concept for many shooters. Let's face it, bad exposures make pictures like look crap. Too light and your eye is directed towards the mistake, not the content. Too dark and the image can be muddy.
What I see most in beginner shooters is many fail to realize how important exposure is as a tool for perfecting their vision. For example, fashion shooters will slightly overexpose skin tones to eliminate imperfections. Landscape artists will often underexpose to gain more saturation and keep the highlights in check.
 |
| Keeping the highlights in check and allowing the image to move towards a darker spectrum adds intrigue to the photograph. |
For me, the single greatest tool of the digital revolution was the creation of the "blinkies." You know, that "flashing black" on your LED screen on back of the camera. That flashing black is alerting you that your highlights have been blown out. No data exists in those flashing areas. What a great tool. For those highlight areas where you need to secure detail, the technology tells you if you got it. If it's too hot dialing back on the exposure can retrieve those highlights. Brilliant technology for photographers.
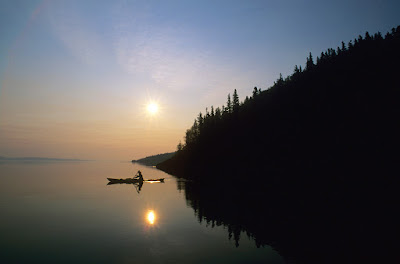 |
| Shooting into the sun usually produces silhouettes, like this scene in the Slate Islands on Lake Superior. The dark kayaker is best seen as he paddles away from shore and the background structures. The image darkened allows all principle aspects of the photograph to be immediately felt without lighting as the camera metering might determine. |
One of the things I tell folks in my photo tours is when acquiring the "Correct Exposure" in the camera, you are now at the "starting point" in creativity. In other words, using light (or shadows) through creative exposure, making things darker or lighter, can enhance the mood in your image.
When looking at photographs, your eye either goes to the brightest or the sharpest spot in an image first. This is a useful tool when creating photographs. You can direct your audience to the subject you want them to see by being aware of these factors. For example, you are out photographing a herd of wild horses in a lovely green meadow. However, the sky is quite overcast. The light on the horses is beautiful and rich. But, when you include the sky, the sky gets blown out. When people look at that photograph, their eye goes to the sky first. We don't want them looking there! We want them to see that gorgeous light on the horses. You need to aim your camera down and eliminate as much of the sky as possible.
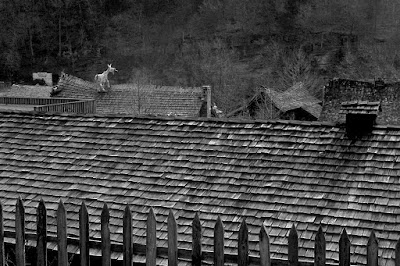 |
| The graphic design of the wood in this scene in Dogpatch, Arkansas was powerful all by itself. But, the white goat was the hook for me. Drawing attention to it by underexposing the scene balanced the whimsical mood. |
As a stylized habit, I always tend to go darker in my images. I adore the saturation. I like the audience going in deeper, seeking information and to feel the mood of the photograph. I use the highlights as a draw and direct the viewer to a location. The areas around the highlights bathe in the shadows. It's a creative method using exposure to steer attention where you want it.
 |
| The highlights of the railroad rails gleaming allowed me to darken the entire image and not lose out on the design the rails created in this image. The oily soil and red engine just popped, even in the darkness. |
Those same images would still be nice without going dark. It's a personal choice. It's a creative choice.
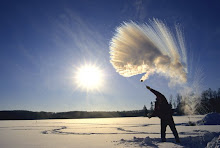
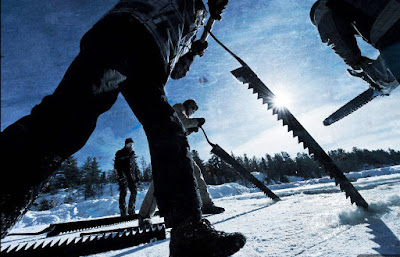 |
| Shooting directly towards the sun with the intent of clarifying the tools used in cutting the ice. Here, a dark exposure defined the ice cutting operation. The viewer gets an immediate perspective of the size of the saws and work involved. |
Zeroing out your meter in the camera is just the starting point.
Feel the light.
What do you want to say with your image?


No comments:
Post a Comment